Here are some of the gadgets and tricks I use regularly to help me get the shot just the way I want it:
- Angle Finder
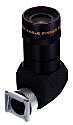
Also called a waist-level finder, this little gadget attaches to the eyepiece of your camera and allows
you to see in the viewfinder while standing (or laying) at an angle to the eyepiece. This is very helpful
when your camera is very low to the ground, such as in shooting flowers.
Example
- Digital Manipulation
There is an amazing amount of tweaking that can be done in the digital darkroom. My favorite use of digital
is to extend the contrast range of film. If the contrast range is too great for the film to be able
to record everything correctly, I take 2 shots (exposing 1 for the shadows and 1 for the highlights) and
combine the good parts of each in the computer.
Example
- Early Morning Shooting
It's been said many times before that early morning or late afternoon light is the most appealing when it
comes to landscape photography. But I prefer the morning because there are not as many people up and about,
and also, the wind generally doesn't start up until late morning. So, there are some quiet opportunities
available that are not there in the evening.
Example

- Extension Tubes
These tubes are placed between your camera body and your lens. They effectively extend the distance to the
film plane, without adding another layer of glass. They let you focus closer for macro work. I don't have a
macro lens, and all the close-up flower pictures I take are with the extension tubes.
Example
- Fill Flash
Fill flash can do wonders to brighten up a subject. The trick is to use a setting for the flash about 1 1/2
stops less than the lighting for the scene. This gives a soft light look, and not an obvious flash look.
Example

- Gold Reflector
A gold reflector will bounce some warm light back into the subject. You can see this happening as you position
the reflector in front of the subject. Example
- Hyperfocal Distance
By setting the lense on the hyperfocal distance for that focal length and aperture combination, you can
achieve view-camera-like depth of field. See my tip on Hyperfocal Distance for
info on how it works and how you can use it.
Example
- Less than Perfect Weather
Sometimes the most dramatic light, or cloud formations, or otherwise amazing photo opportunities can
occur when the sun is not shining. Just because the weather is less than perfect doesn't mean you should
pack up your camera and head for shelter. Be sure to take precautions so that both you and your gear stays
warm and dry.
Example
- Off-the-Shoe Flash Cord
When doing very close-up images (such as flowers), this is crucial. If you have the flash on top of the camera,
the light will go straight out instead of down where your subject is. With the off-the-shoe flash cord, you can
either hold the flash in your hand, or use a macro bracket to position it where it is needed.
Example
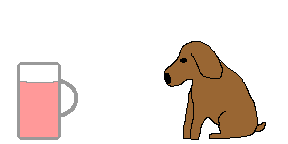
- Photograph animals from their eye level
It makes the image feel more intimate, like you are right there with the critter.
Example
- Polarizer
A polarizer is a tool that should be used judicially. Used too much, and the image is obviously polarized
- the skies are unnaturally dark and the viewer immediately identifies the image as one taken with a
polarizer. Because it is often overused, the polarizer gets a bad reputation. But it can be a very valuable
tool. It can bring out the blue and make skies darker, also bringing out the detail in clouds. It can also
reduce glare and reflections on glass or water so you can see what is under the water or behind the glass.
"What you see is what you get". Watch in the viewfinder until you get the effect you want.
Example
- Neutral Density Filter
A neutral density filter adds density, or darkness, to the whole image. This is generally used when you
want to use longer shutter speeds than are possible for proper exposure. For instance, if you want to use
a shutter speed of 1 second in the middle of the day with ASA 100 film in order to capture a soft, fuzzy
look to water. These filters come in various degrees (or stops) of neutral density. I will often use a
polarizer for this purpose (gaining 1 1/2 stops of density and also darkening the blues).
Example
- Split Neutral Density Filter
With a split neutral density filter, you can darken a bright portion of the image, thus bringing the
contrast range down to a more printable level. These filters are 1/2 clear with a gradual coloring into
1/2 grey coloring. The color does not add any color shift, but only density (makes the meter think the
area covered by the grey is darker than it really is). They come in various densities (1-stop, 2-stop, etc.)
Example
- Self Timer
I have a shutter-release that attaches to the camera and allows me to stand a few feet away from the camera
and trip the shutter. This is especially helpful when using a long lense to help eliminate the vibrations
caused by pressing the shutter release with your finger. But I am not especially fond of the way it works
with my camera. Especially in the cold when I have gloves on, the mechanism is very difficult to attach. And
then it is sticking out the side of the camera inhibiting carrying it the usual way. Canon really needs to
redesign this (Canon, are you listening??). So, instead, I use the self-timer. On my camera, I can set it for
a 2-second delay. Note that this technique DOES NOT work on subjects that move!
- Tripod
I use my tripod almost constantly. (The exception would be when both my subjects and I are moving around a lot,
such as in shooting people). For nature shots with immovable subjects where you need a large depth-of-field
(which usually means a langer shutter speed), or if you are using a long lense, or if doing macro work, the
tripod is a tremendous asset in getting sharper pictures. I consistently lug it up mountains, even when
backpacking. It is worth it!