There are times when the contrast range of a scene is too great for the film to record everything acceptably. If you
expose for the sky, your shadows go black with no detail. If you expose for the shadows, the sky is a hot white blob
with no details. And if you expose for the midtones, you get muddy shadows and a light sky. You can't win. Or can you?
Enter the computer and the powers of digital imaging!
Setup:
Materials needed: meter, tripod, camera, film
If, after metering the scene you see that it can not be done traditionally, you'll need to put the camera on a tripod
and take multiple exposures ( multiple frames). Meter for the highlights and shoot the picture at that setting. Meter
for the shadows and shoot another frame at that setting. If the range is more than 5 or 6 stops, expose a third frame
metered for the midtones. It is important to keep the camera on a tripod and not move it between exposures, because you
will be merging these 2 or 3 images in the computer later.
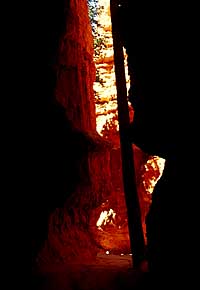
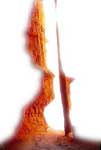
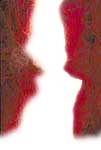
Figure 1 |
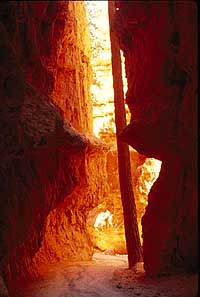
Figure 2 |
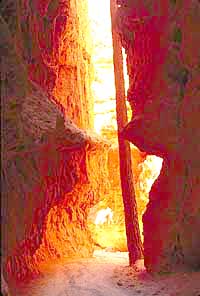
Figure 3 |
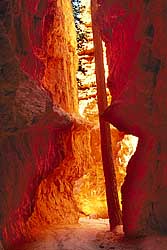
Figure 1 was exposed for the highlights in the background. Figure 2 was exposed for the center, bright
orange tones, and Figure 3 was exposed for the dark foreground (dark red).
Scan the 3 images using a desktop film scanner or have your local processor scan them to a PhotoCD or removable disc
such as a ZIP disc. If you are intending to print this image on paper, then you'll want to scan at a resolution high
enough to allow for a good print.
Manipulation:
Materials needed: scanned images, computer with imaging software
In the computer, you are now going to select the parts of each of the 3 images with the respective proper exposures
and combine them into a "properly exposed" whole.
Step 1:
- The first thing I do is to combine all three images into 1 image with 3 layers using Adobe PhotoShop.
- Open all 3 images in your image editing software.
- Figure 1, the "highlights" image, will be our "base". We won't do anything to this image, we will be
selecting areas from the other two and laying them on top, covering up the parts of the "base" that are not properly
exposed.
- Put a copy of the entire Figure 2 onto the Figure 1 image as a new layer. Make your second image
(Figure 2)
the active image, (move the mouse into Figure 2 and click). "Select" the entire image by choose Select -> All
(or CTRL-A on a PC or Command-A on a MAC). Then place a copy of the entire Figure 2 into memory by choosing
Edit -> Copy (or CTRL-C on a PC or Command-C on a MAC). Move the mouse into Figure 1 and click to make it the
active image. Now, place the copy of Figure 2 onto the Figure 1 image by choosing Edit -> Paste
(or CTRL-V on a
PC or Command-V on a MAC). Now your base image (Figure 1) has 2 layers - one with Figure 1 and one with
Figure 2.
- Follow the same steps to add a new layer to the image containing Figure 3.
Step 2:
- Starting with Layer 2 (Figure 2, the "midtones image"), and using your favorite selection tool, (I use the
 lasso and a mouse, some people might prefer the "Pen" tool, or a pen tablet. The selection tool you use doesn't
really matter, just as long as you can make an accurate selection), create a selection of the midtones by drawing
around the mid-section of the image.
lasso and a mouse, some people might prefer the "Pen" tool, or a pen tablet. The selection tool you use doesn't
really matter, just as long as you can make an accurate selection), create a selection of the midtones by drawing
around the mid-section of the image.
- In order to get a very accurate selection, I like to zoom in so that I can see the edges very closely, and can
better see where I should draw. When you are creating a selection out of such a big area, remember that you can
"select" a small piece, and let up on the mouse to give your hand a rest. Then, holding down the "Shift" key, start
drawing again, and fine tune the selection so that you have all of the area you want. (Holding the "Shift" key while
using one of the selection tools allows you to add to the current selection. Holding down the "ALT" key on a PC - or
"Option" key on the MAC - allows you to subtract from the current selection.)
- You could also draw a selection around the burned-out highlights (since in this case it would require much less
"drawing"), and then choose Select -> Inverse to switch the active selection to the "opposite" of what you
drew around, or the midtone and shadow area of the image.
- Either way, you now have the midtone area selected.
- Once you have your selection fine-tuned, you'll want to "feather" the selection to give it a softer edge so that
it will blend in with the other image nicely. Choose Select -> Feather -> <enter a number - let's use 5 pixels>. Without "feathering", the selection will have a hard edge and will look "cut out".
- Follow the same steps to select the desired areas from Figure 3.
Now you have one image with all areas properly exposed. You can now further fine-tune the blending of the images with
the layering capability of PhotoShop. With each image on a separate layer, use the eraser tool (set at "airbrush" mode
and about 10% opacity, and with a medium-sized brush) to soften the effects of the "cut-out" look of each image. Go
along the edges and "airbrush-erase" to make the edge softer, and the colors blend nicely.
The result is an image where all areas are more like what your eye saw, but the film could not record. You have "cheated your film's recording capabilities".